Best DIY gifts for Teenagers

Teenagers… they can be a nightmare to buy for let alone make things for! My advice is to not DIY gifts for teens you don’t know that well!

  1. DIY Gold Leaf Jewellery Tray
Jewelry Tray Display

Credit: Homey Oh My

I mean, I would love this now just as much as I would if I were 16!

2. DIY Galaxy Print T-Shirt

Galaxyshirts

Credit: byhandlondon

Fun and cute. Their friends will ask where they got it, you will be cool forever.

3. A Starbucks Cup gift

Credit: somuchtodew

Obviously include a Starbucks gift card but you can tailor this to your teen. Add little Lego toys for boys, think small beauty items like nail varnish for girls.

4. Chalkboard Coasters

Credit: westermanfam

These are a great present for slightly older teens (think 17+) who are about to head off into the wilderness of real life. Everyone needs coasters!

5. DIY Passport Holder

Credit: AlwaysRooney

Feed their wanderlust with a custom passport holder!

6. Soda pop candy bottles

Credit: kmckaydesigns

Technically a father’s day gift but I know a lot of teenage boys who would love this!

7. Lip Balm Locket

Credit: beautylish

Just love everything about this, I am forever without lip balm, anyone want to make this for me?

8. Lounge Pants

Picture of How to Sew Your Own Pajama Pants

Credit: compwalla

Make these in an appropriate fabric, the more aligned with their interests the better! Think Comic Books, Superheroes, Video games, Disney etc. Find out what they like!

9. Heat-resistant Hair Straightener Cozy

Credit: gatheringtwigs

This is a brilliant DIY and parents will thank you for not allowing their house to burn down!

10. DIY giant chevron floor pillows

pin

Credit: OverLovin’

Teenagers will LOVE these floor pillows, brilliant for lounging about with their friends. Try and match the fabrics to their room decor if possible!

Pin this for the future:

TeenOval

Advertisement

Best DIY gifts for Best Friends

Continuing my posts on DIY gifts for different people in your life, I’ve compiled my favourite gifts for best friends. Besties can be hard to buy for, especially if you don’t see them as often as you’d like to!

1. Teacup Lights

Teacup Lights

This is a super cute DIY, that’s gentle on the purse but looks awesome when given to someone.

2. Mini Book Necklace

I love this DIY, I’ve made two of these for my besties in the past and will likely make another for myself soon!

3. Scrabble Coasters

I love all things scrabble themed and these would make a gorgeous gift.

4. DIY Gold Flutes

DIY Painted Glass

I love how elegant these glasses are and how easy they are to do!

5. Homemade coffee syrups

Coffee-Syrups-ChaosServedDa

Perfect for your caffeine addicted bestie!

6. Cute make-up bag

IMG_6560

I for one am always in need of a new makeup bag and this DIY is super easy. Pick fabric to suit their personality and go to town!

7. Earlier this year I posted my monogrammed mugs DIY made for a couple of my besties:

Finished Mugs

I really enjoyed making these mugs and I’m tempted to make some more this year!

8. DIY Mini Spa Kit

For your stressed out bestie, pair with slippers and a hot water bottle so they can pamper themselves and relax.

9. 30 Minute Infinity Scarf (You don’t even need knitting needles!)

30-minute-infinity-scarf-gaba

Ok, I’m going to have to make this even if I don’t give it to anyone else, it looks so snuggly and so easy to make.

10. Emergency Chocolate

Emergency Chocolate Craft on 30 Minute Crafts

When in doubt, chocolate is the answer and this is an awesome way to give it!

These are my top 10, let me know in the comments which are your faves…

Pin this for later:

BFFOval

10 Best DIY Gifts for “Geeks”

Continuing the Christmas DIY gift lists, these are my 10 best DIY gifts for so called “geeks”. Really this is just a chance for my fave Fandom based DIYs to shine!

1. Bow Tie Tuxedo frame:

Credit: Plaid

So this tutorial isn’t actually Dr Who themed but it was where my brain went immediately when I saw it. I would theme it with a white checked shirt and add braces to make it even more Dr Who themed. Add a photo of you and your geeky friend for the perfect, personal gift!

2. Batman Lamp:

Picture of Batman lamp

Credit: fabrika.carolija

This looks awesome and the perfect gift for the Batman fanatic in your life!

3. Harry Potter Wand:

Tutorial to make these diy wands for your Harry Potter party

Credit: Boxy Colonial

This tutorial is aimed at making multiple wands for a Harry Potter party but there’s nothing to stop you making one for your geeky loved one!

4. Darth Vader Shoes:

Darth Vader Shoes Tutorial

Credit: Twin Dragon Fly Designs

I love geeky shoes. They’re practical, subtle (ish) and still show your geeky side.

5. TARDIS Christmas Tree Ornament:

Picture of DIY TARDIS Ornament

Credit: craftycounterpart

The perfect addition to any Whovian’s Christmas Tree.

6. Comic Book Heels:

Credit: ironspleen

I don’t even think this needs explanation… amazing.

7. Harry Potter Potions Kit

Harry Potter potions kit

Credit: Stitch/Craft

This is amazing, I want this, who wouldn’t want this? The potions actually do things (spoilers, it’s basically a science experiment wrapped up as Harry Potter which I LOVE.)

8. Pixel Trash Can:

Picture of Pixel Trash Can

Credit: BrittLiv

Practical and geeky. Wins every time!

9. Pikachu Hoodie:

Pikachu-Hoodie-Instagram

Credit: kawaiikakkoiisugoi

Gotta catch ’em all! Perfect DIY for the Pokémon fan in your life!

10. Hunger Games Tote Bag:

Credit: showmecute

May the odds be ever in your favour when you make this awesome tote bag!

Pin this for future reference:

geekoval

10 Best DIY Gifts for Men

It’s October, that means there are only 11 weekends until the big C word… Christmas! If like me, you prefer to make gifts rather than buy them, then that means starting now. Unfortunately, my full time job gets in the way of crafting all day, every day so every weekend between now and then will need to involve some craftiness to get everything ready by Christmas. The last couple of years I have been horribly disorganised so this year will be different!

I’ll be posting DIY gift lists for different people in your life over the next couple of weeks as inspiration!

Here are my 10 best DIY gifts for the men in your life:

  1. Make a handmade leather catch-all tray:
Make a leather valet tray tutorial

Credit: 17Again

I’ll be attempting this one soon, check out Facebook to see how it goes!

2. The Story of Us:

Image

Credit: The Unengaged Undergrad

This one is so good, I pinned it twice… I’ve been saving things to scrapbook for ages so this one might be on the cards for Christmas or possibly our anniversary since that’s in January!

3. Lego Key Holder:

Credit: Felix Grauer

Because organisation is more fun with Lego!

4. Bacon infused Whiskey:

Credit: Modern Wife Style

Because literally everything is better with bacon.

5. Comic Book Coasters:

DIY comic book coasters

Credit: Modpodge Rocks Blog

For the Comic Book lover in your life. This principle is easily applied to other fandoms/geekiness 🙂

6. CD Photo Cube:

Credit: Paper Jewels

I made this one for my Dad using old mini-disc cases (who remembers mini discs?!)

7. Make him a Nut and Bolts Chessboard:

Credit: Reddit user shama_lama_ding_dong / WonderHowTo

Does he love chess? Take a trip to your local DIY store to get everything you need.

8. Paracord Lanyard:

Credit: Storm Dranes

This project is the perfect amount of fun for you and cool for him!

9. Grill Rubs:

Credit: Kojo Designs

For the chef in your life, these rubs look great! This tutorial even includes free printable labels. Ikea have some great spice jars for this project.

10. Home Made Chocolate Fudge Gift:

Credit: What’s Gaby Cooking

And finally if you’re strapped for cash, one of the best home made gifts is the gift of food! It’s easy to make it look nice with ribbon or these pretty bags from Lakeland.

Pin this post for future reference:

Picture1

Now I’m off to indulge in a Lakeland spree to so I can make chocolates for my extended family!

Build a Fort Kit (UK style)

Build a Fort Pic

A long time ago, or so it seems, I talked about making a “Build a Fort” kit using UK sourced items but based on this DIY here.

If you would also like to do this, you will need the following:

– A lantern (I got this wind-up and solar powered LED lantern from Tesco for about £5)Build a Fort Kit 8

– Two single sheets or blankets (I used these, also from Tesco)

– 4 metres of ribbon for creating loops (I bought mine from Wilkinsons around Xmas but any haberdashery type shop or even pound shop should have some ribbon, mine was pale blue to match my colour theme)

– Pegs (I used the blue ones from this pack from Wilkinsons and covered them with decorative tape)

– Suction cups (I used these from Wilkinsons and removed the hooks)

– a sewing machine or you could hand sew this, it’s just a matter of time.

– a bag to put everything in (I used a cloth shopping bag)

First step is to decorate your pegs if you would like them to be a bit more interesting:

Build a Fort Kit 6

I used two different kids of decorative tape, one with chevrons, one with stars and then left some plain blue. This probably took me half an hour to do one evening in front of the tv.

I cut 12 ribbons to 20 inches in length:

Build a Fort Kit 2

You will also need a length of ribbon roughly twice the length of your blankets.

Some were a little shorter but it doesn’t matter. I pinned a 20 inch ribbon in a loop to the corners of both of the blankets:

Build a Fort Kit 3

And then one to each edge in the centre of the blankets:

Build a Fort Kit 5

However, knowing that the boys I was making this for have large built in cupboards in their playroom with sheer surfaces, I wanted to give them another option for making a fort, which is where the suction cups came in.

I took the bag of suction hooks and pulled each hook off which left me with a load of suction cups with a convenient hole in the middle:

Build a Fort Kit 9

I then threaded a suction cup to each of the loops I’d added to the blankets:

Build a Fort Kit 11

I then took the extra long length of ribbon that was left over, attached a suction cups at each end and tied a knot to keep it on.

Build a Fort Kit 12

The I popped everything into the cloth bag and tied the handles together with the ribbon that came with the two blankets:

Build a Fort Kit 14

My cousin came over the next day and we visited Didcot Railway Centre for their Thomas Day. I gave the boys their present just before they left and they were both very excited to get home and start using it!

Lost in the midsts of work…

Has it really been three months since I posted anything? It feels like 5 minutes ago! It’s been a pretty crazy three months, I’ve been on three holidays (yes, you read that right, I’m not sure how it happened either!) and a trip to Portugal with work. Between that, actual work, helping my brother prep for his GCSEs and trying to have a social life, everything else has fallen by the wayside. However, I have squeezed some crafting in even if I haven’t managed to post about it!

One of my favourite people departed our team at work in February, I’m lucky enough to be friends with her outside of work so it’s not the end of the world but I still miss her face. I wanted to get her a present but I knew the team were covering that with some amazing gifts (a Rainbow light anyone?) In the end I went with a framed photo of us and another work/life friend. I had an Ikea Ribba frame already but it seemed a bit boring as it was just plain white. I found a gold sharpie and coloured the corners on it to make it look a bit more fancy:

JadeFrame

Quick, easy and relatively risk free, my kind of crafting!

About two weeks later, we were off on a girls holiday to Disneyland Paris and, of course, we decided that having matching t-shirts was a great idea. In hindsight, matching hoodies would have been more weather appropriate for early March! We also failed to get a photo of the four of us in those t-shirts but mainly because we were too busy having fun!

Here’s me, in mine, at the hotel before I put two jumpers on for the day (Yes those are Minnie Mouse ears…):

Disney Tshirt

This was made using Powerpoint to create the design which was then saved as a JPEG. I Googled for the Disney Castle logo and used a Disney font from here to write Disneyland Paris 2015 and each person’s name underneath.We each found a silhouette of our favourite character for the back of the shirts as well. These were then printed onto Iron-On transfer paper from Amazon. For some reason this paper is really hard to come by in high street shops or even Hobbycraft. In fact, the girl who worked at Hobbycraft told me it had been discontinued by which I presume she means that Hobbycraft have discontinued it because you can definitely get it on Amazon! We messed up one of the transfers and I had to buy some more at the last minute, I managed to get some from Rymans but it was much lower quality than the stuff we had from Amazon so I won’t link to it as I don’t recommend it!

I also finally got around to making that Build a Fort Kit for my cousin’s kids that I talked about here. This is going to be a post of it’s own here.

I managed to finish a project that I’d had going for more than 9 months, back in April last year I found this tutorial for a Shark bag. My lovely housemate got very excited about it and I offered to make it for her birthday in July. Clearly that didn’t happen! I totally lost my mind when I was sewing and didn’t follow the instructions properly (I basically sewed the middle up completely and this made putting the zip in totally impossible rather than just mildly difficult.) Rather than unpick the most ridiculous amount of stitching, I asked Lucy how she felt about having a shark shaped pillow/cuddly toy instead of a shark bag. I’m pleased to say this went far better than the whole bag concept and I found a use for some of the leftover stuffing from this dog bed project!

Shark Pillow

Monogrammed Sharpie Mugs!

I pinned this tutorial way back in June last year to my Gift Ideas Board. I finally got around to doing this yesterday for Tom and Beth (two of my best friend’s) Christmas presents. Time got away from me a bit this Christmas, I’m aware it’s quite late in January!

You will need:

  • Mugs (I got mine from Amazon but I think Asda or Wilkinsons would have been cheaper!)
  • Oil Based Paint Pen (I used a gold, oil based paint Sharpie)
  • I didn’t have scrapbook stickers like Stacey did so I thought I’d just use ordinary address labels. As I discovered later, these aren’t really thick enough but I couldn’t find any proper stickers to use and I preferred being able to choose the font of the letters.
  • Oven

I typed the letters I wanted to use into Word and then played with the fonts until I had the ones I wanted. I printed these onto address labels and then cut them out. I held the letter against the mug to decide where I would position it before I peeled the back off and then stuck it on firmly.

Starting Mug

I dotted all around the letter, I concentrated on the edges of the sticker to start with and then randomly dotted away in a rough circle:

Halfway Mug

I left the mug to dry for 20 minutes or so and then I peeled the sticker off. That’s when I discovered that the paint pen had bled through the sticker a bit. It wasn’t horrific but it wasn’t perfect either. Since I’m a perfectionist I spent 5 minutes just scratching the excess paint off (I didn’t have any rubbing alcohol to clean up with, anyone know where to get that in the UK?!)

I then baked the mugs for 30 minutes at 170° C. When the time was up, I switched the oven off and left the mugs to cool for another couple of hours.

I’m so pleased with the final present (even if it is basically a month late!):

Finished Mugs

I’ve asked my friends to let me know how they get on with washing these in the dishwasher if they decide to risk it!

I’m also planning to make a geometric shapes one using masking tape, I’ll post it when I find five minutes.

I enjoyed this project because it didn’t take forever and looked really great as a finished product. The actually painting probably only took 20 minutes per mug plus 5 minutes for cleaning up around the edges. Once the mugs were in the oven I could go off and do whatever else I needed to and just come back when the timer went to switch the oven off.

My Inaugural Post

Follow my blog with Bloglovin

Welcome to my inaugural post!

I figured I’d start by sharing some of this year’s successful projects, since it’s nearly 2015! This year has been incredibly busy for me in terms of work; I’ve completed my green belt in Lean Six Sigma (project management) on top of my usual day-to-day role which has been much harder as we were two team members down for a large chunk of the year!

I still found time for these little projects though:

1. A “Puntastic” thank you present

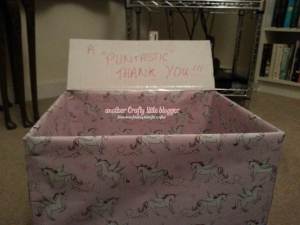
This was a gift box I put together for a friend and colleague who helped me massively during my Lean Six Sigma qualification; crunching data for me and being a sounding board when I was getting increasingly stressed and mental.

As we both love puns and wordplay I put together a box of mini presents to say thank you. I wrapped a box in wrapping paper inside and out (wish I’d seen this tutorial before for the inside!)

Puntastic Box

I hit the jackpot in Tesco as I found present tags shaped like speech bubbles. I have saved the leftover ones and will likely trace around them in the future!

I started with some Krispy Kremes and added a tag saying I “doughnut” know what I would do without YOU!

KrispyKremes

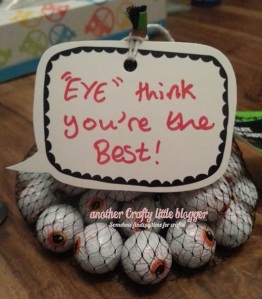
I was putting this together just before Halloween so I couldn’t resist the eyeballs chocolates:

Eyes

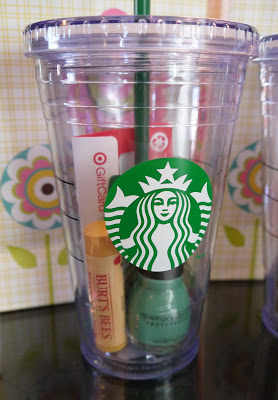
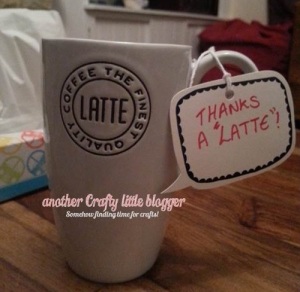
I found a lovely large latte mug (Sainsburys) for the classic “Thanks a Latte” pun. I didn’t get a picture of it but I also got a £10 Starbucks card and squeezed it inside the mug.

Latte

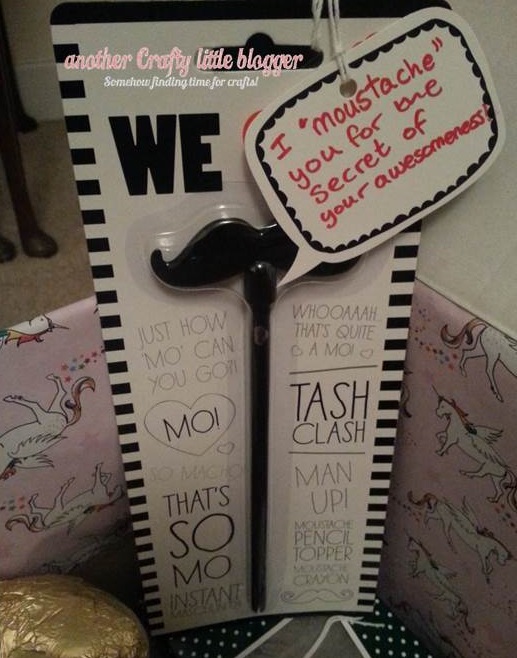
Everyone loves a moustache! I found this moustache pencil topper in W H Smith’s while I was waiting for my housie to post something. “I moustache you for the secret of your awesomeness” sounds best when said like Sean Connery!

Moustache

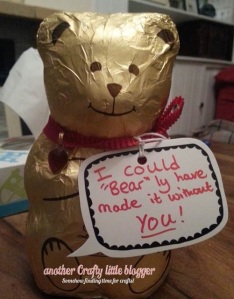
I had a lot of choices on the bear pun but I went with a Lindt bear in the end

Bear

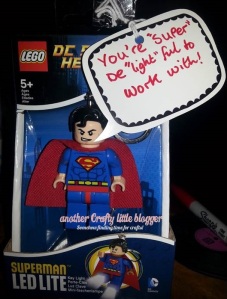
My friend is a major fan of Lego so I got her a Lego key ring torch (also Sainsburys). Superman since she saved my sanity on more than one occasion! Also I liked that it created a double wordplay/pun opportunity:

Superman

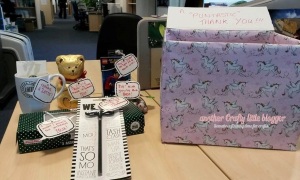
And here is the final present:

Finished Puntastic gift

I hid it in my car, waited until she had gone for the annual office flu jab and put it on her desk for when she came back.

I think she likes it!

Jade Likes It

2. An impromptu Alice in Wonderland Costume

Our office decided to have a charity dress up day. As I’m the social committee floor rep (don’t ask me how that happened!) I felt I definitely had to get involved. I had a blue pinafore dress already so I decided to improvise by getting a white blouse and make a white apron from some scrap material:

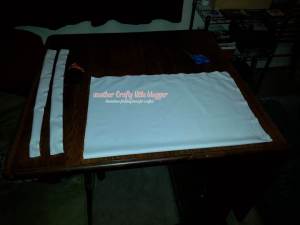
I essentially sewed a sealed pillowcase and attached two strips as ties:

Apron

Last year’s christmas party was also Alice themed so I had a big bow headband to wear. My final outfit was topped off with stripy socks borrowed from the housie:

Alice Costume Alice closeup

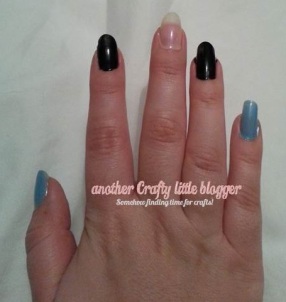
I also made my first foray into nail art:

Alice Nails Tut Alice Nails Tut2Alice Nails Tut3

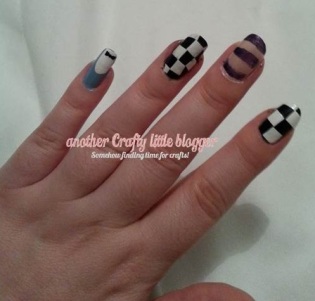
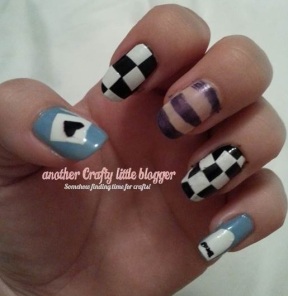
I used this tutorial for the white square decals on my chequerboard nails, pinky and thumb nails. The heart and bows were done with a sharpie (I know, but it was gone midnight by the time I finished!!)

It turned out our team were some of the few to get properly dressed up but we raised lots of money nonetheless:

Halloween Dream Team

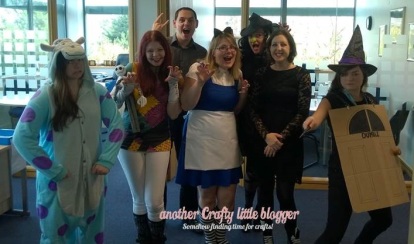
Yes that is a puntastic “Dumble-Door” on the end there!

3. Christmas Nails

I failed to get pictures while I was doing this one but I have the final product:

Christmas Nails

I used nail striping tape (from Amazon here) to do the christmas trees and then a nail dotting tool (also from Amazon here) to add the baubles and stars on top. I thought doing trees on all my nails would be a bit much (plus I’m lazy…)

They looked good on Christmas day!

Christmas Nails

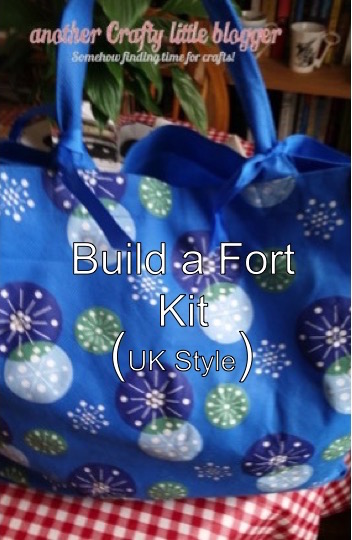
I’ll be making a build your own fort kit (based on this tutorial) for my cousin’s kids over the next couple of days so I’ll be back with a British version of the tutorial on it soon. I’m babysitting for the kids on New Year’s Eve so hoping to have it finished by then!