Anti Gravity Chocolate Madness 18th Birthday Cake

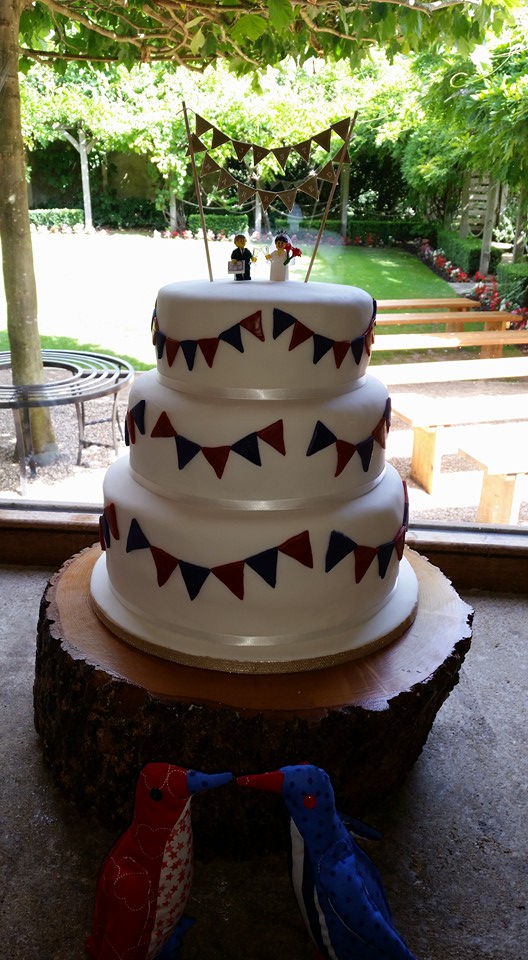
My baby brother turned 18 this month. I still remember him like this:

1279034_10151637927766336_2102832614_o

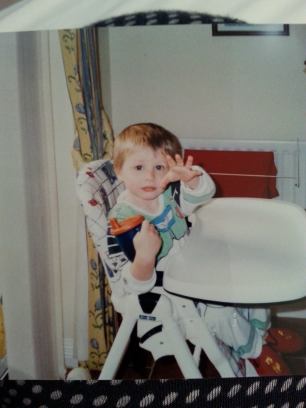
(He will obviously thank me for this photo being on the internet)

Luckily I made him an awesome birthday cake so hopefully he’ll forgive me.

chocolatemadnesscake

Anyone who follows me on Pinterest will have seen various versions of this cake before pinned to my CAKE. board.

The cake itself is a chocolate sponge made using Angela Nilson’s Ultimate Chocolate Cake recipe

I made the cake in a tall 8 inch cake tin and then cut it into three layers. The cake recipe includes a recipe for ganache that was more than enough for me to fill three layers of cake and cover the top and sides to attach the chocolate.

I used about 4 “Sharing” packs of Maltesers and 4 “Sharing” packs of crunchy M&Ms. The cake took 15 4 finger Kit Kats to cover the sides. You can buy multi packs of 4 finger Kit Kats. I think they come in packs of 8 so you’ll need at least two packs, I bought three to be on the safe side, never hurts to have some spare chocolate at the end!

Now for the magic…

To get your anti-gravity effect you could use a special metal anti-gravity cake kit like this one that Lakeland sells.

Orrrr you could use the big straws that you have left over from making a wedding cake

2016-09-14-19-02-09

Not the greatest quality photo since my brother’s birthday was a Wednesday night and I was trying to get the decorating part done between arriving home from work at 7 and going out for dinner at 7:30!

You can buy the straws in packs of 45 from Amazon here for a couple of quid. I only used 2 for this cake and around 15 for the wedding cake so I’ve still got loads left!

I basically shoved the straws into the cake at 45 degree angle and then coated the outside with ganache using a palette knife and attached the sweets. Note the maltesers are really flipping easy to attach since they’re so light. The M&Ms… not so much. I actually have a real dislike of M&Ms after trying to get them to stick to the straw for this cake 🙈 All it takes is a little bit of patience and time, neither of which I had in the 30 mins I had to complete this!

After we got back from dinner we did candles:

img-20160914-wa0012

Yes that does read Happy Bday… life’s too short to try and find the missing alphabet candles at 10 pm!

Overall I’m happy with how this turned out given how little time I had to spend on it!

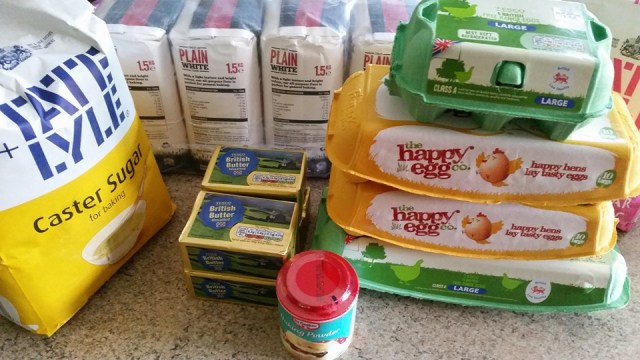
To make your own you will need:

Equipment:

20cm wide, 7.5.cm deep cake tin

Palette knife

Mixing bowls

Plate or cake board

Boba Straws

Ingredients:

For the cake:

  • 200g good quality dark chocolate, about 60% cocoa solids
  • 200g butter
  • 1 tbsp instant coffee granules
  • 85g self-raising flour
  • 85g plain flour
  • ¼ tsp bicarbonate of soda
  • 200g light muscovado sugar
  • 200g golden caster sugar
  • 25g cocoa powder
  • 3 medium egg
  • 75ml buttermilk (5 tbsp)
  • grated chocolate or curls, to decorate

For the ganache:

  • 200g good quality dark chocolate, as above
  • 284ml carton double cream (pouring type)
  • 2 tbsp golden caster sugar

For the decorations:

4 packs of Maltesers (large sharing packs)

4 packs of M&Ms (large sharing packs) (I used the crunchy variety)

3 packs of 8 x 4 finger Kit Kats


Advertisement

Best DIY projects for Big (or little) Dogs

If you’ve got a big dog (or even just a dog larger than a pug) and you like to craft then you know the struggle of finding fun DIY things to make for them. It’s like the craft world decided that only small dogs like being dressed up or something! Below is a collection of DIYs I’ve found that are either created with larger breeds in mind or are easily adapted to them.

Let me know your favourites!

Dog Hoody

Build a pet agility course

Dog boredom buster


DIY Car Safety Hammock

Busy ball toy

Raised dog dining table


DIY Flirt Pole

Sew your own winter dog boots

Or


I’ve also got a DIY dog bathrobe tutorial coming soon 🙂


That time I agreed to make a wedding cake…

…and didn’t have a complete breakdown!

Once upon a time, Jade and Dave decided to get married. Jade asked me if I could make their wedding cake. I said yes, I’d love to. I spent several months failing to find a red food colouring that was bake stable (you lucky Americans!) as the original plan was to have a red velvet cake. I spent some time perusing the internet for alternative recipes and found an awesome Madeira cake recipe on Cakes, Bakes & Cookies that included how to scale the recipe for different sized tins which I desperately needed!

I did a test run with my 12 inch cake tin and it turned out OK:

2016-04-09 19.33.40

A little cracked and the mixture wasn’t as light as I wanted it to be. I decided this was down to the fact that I was using my mum’s food mixer that was a wedding gift 37 years ago! I got a new mixer and it made all the difference!

I did a two tier test run using a 10 inch and an 8 inch cake:

I used cheap blue and red fondant from Tesco to test out the bunting. I also tested how sturdy the stacked tiers were:


I used jumbo straws instead of dowelling (and failed to get a pic of it) but there is a great YouTube tutorial here

For my two tier test run, the top tier had buttercream and lemon curd sandwiched between the layers while the bottom tier had buttercream and strawberry jam. I took half of the ten inch cake and the whole 8 inch cake into work. Despite my team’s incredible capacity for eating food, I had to enlist people from the wider business to help eat all of it!

So two weeks before the big day I assembled all of my ingredients:

13680966_10154486341316336_4986905921474882553_n

Total ingredients I used for three tiers:

Butter: 948 g

Stork (Margerine): 948 g

Caster sugar: 2,526 g (~2.6 kg)

Vanilla Essence: 13.5 tsp

38 eggs (Words cannot describe how difficult I found it to work out how many boxes this worked out to… 1 x 12 egg box, 2 x 10 egg box and 1 x 6 egg box!)

Plain flour: 2,847 g (~2.9 kg)

Baking Powder: 20 tsp

Hot Water: 36 tbsp (640 ml)

4.5 kg of White fondant icing

Note that I made two of the 12 inch cake to make the cake tall enough.

I spent a weekend baking all 4 cakes which became three tiers and then froze all of the cakes. I followed the advice here for freezing the cakes.

The day before the wedding I defrosted, cut, filled, crumb coated and covered the cakes in white fondant. That took about 8 hours! I then cut out all of the bunting using these cutters. I used the largest one for the 12 inch tier and went down a size for each tier up.

I covered the cake board with white fondant and used hessian ribbon around the edge to go with the rustic barn theme.

Obviously Apple helped:

2016-08-12 12.00.03

I love how Bunny is also looking wistfully outside

And here it is:

Image of Wedding Cake

I am so genuinely touched that Jade and Dave would trust me with such a major part of their big day. Which they know because I had a small breakdown during their speeches! I got a gorgeous gift that I will definitely use a lot:

2016-08-28 18.10.03

(T Swiz references win every time!) And I can only hope there is one photo of the speeches on the day that doesn’t have my ugly crying face in the background!

All the stress was totally worth it for this gorgeous pair:

#DavidandJadeWedding

Slow Cooker Chocolate Orange Fudge

So this video popped up on my Facebook feed early in December and I loved the idea of making fudge in the slow cooker.

I changed the ingredients for my fudge but the basic principle is the same.

You will need:

1 cup of milk chocolate chips

1 cup of dark chocolate chips

1/4 cup of whipping cream

1/3 cup of honey

1 bar of Lindt Excellence Dark Chocolate Orange Intense Bar (100G) broken into pieces

1 tsp of vanilla extract

1. Place the chocolate chips, whipping cream and honey in the slow cooker and cook on high for 1 hour.

2. Stir in the pieces of Chocolate Orange bar and the vanilla extract until they’ve melted

3. Pour the mixture into a dish to set (I used a square pyrex dish)

4. Cut into chunks and give them away! (OR eat them alllll)

Fudge


Festive Tea Wreath

Featured Image

So in my continued quest to DIY as many of my presents as possible I made a tea wreath!

I was originally inspired by this tea wreath but decided that I couldn’t be bothered with all the clothes pegs! I went with double sided sticky tape instead.

I used a 20 bag box of Pukka Organic Peppermint Licorice Tea Bags and a 20 bag box of Taylors of Harrogate Spiced Apple Tea Bags; I confess mainly for the colours, though the spiced Apple one is nicely festive too!

You can use any tea you like to make this, just make sure you buy tea that comes in individually wrapped packets (usually this means buying the nicer, more expensive ones).

You will need:

40 teabags in any combination of colours and flavours

Thick cardboard or foam board

Double sided sticky tape

Colour coordinated ribbon

A glue gun (optional)

Steps:

  1. Cut out your wreath from your cardboard or foam board.

I started by putting a standard dinner plate on the back of some flimsy cardboard from a pizza and drawing around it. I cut this out and then marked the inner circle with the base of a bowl. I used a wooden clothes peg at this stage to make sure there was enough cardboard for a decent layer of teabags.

I then used double sided sticky tape to attach my cardboard doughnut to some foam board I had lying around:

tea wreath1

Then carefully* cut the foam board to match the cardboard using a craft knife.

*Confession: Not that carefully because I did this really late at night and I’m an idiot so I thought I’d nick my finger:

Cutyoself

2. Lay your teabags around the wreath and work out where they look best:

Teaplacement

3. This would be a good time to attach your ribbon to the wreath (I didn’t consider this until later and had to attach it to the back.)

Start sticking your teabags down using double sided sticky tape, working from the outer layer inwards:

tapeplacement

first two rounds

4. Attach a ribbon to the back of the foam board using staples and a glue gun if you haven’t attached it at step 3!

Finished Wreath

And you’re done!

This probably took me about an hour and a half from start to finish but makes a gorgeous and thoughtful present.


The Innocent Big Knit 2015

I’ve finally managed to knit something!! I’ve knitted three hats for the Innocent Big Knit event which aims to raise awareness and money for the charity Age UK

IMG-20151105-WA0005

These were made using Innocent’s basic hat pattern

I’m hoping to make at least another three before the deadline in December. These hats are then put on Innocent Smoothie bottles in shops and a donation is made to Age UK for every bottle sold with a little hat on them. Follow Innocent Smoothies on Facebook to see some of the amazing and creative other hats they’ve received!

Fairy Tulle Skirt Tutorial

HalloweenTulleSkirtACLBHalloween this year was mostly celebrated in the office for me. We had a costume competition and there were trophies at stake!

I went as a fairy since I already had some wings that I bought years ago. What I needed was a fairy tulle skirt so I decided to make my own. There are plenty of tutorials out there on Pinterest for this and I skimmed them to get a basic idea of what I needed to do before I started.

I bought 3 metres of tulle, 1 metre of black, 1 metre of purple and 1 metre of red from Ebay (which cost me less than £5) I already had some elastic but I wish I’d used black elastic rather than white so consider this if you’re using dark coloured tulle.

I was pleased with my final result!

If you’d like to make this skirt you will need:

  • Needle and thread (or a sewing machine)
  • Elastic (black would look better)
  • 1 metre of tulle in each colour you want to use (up to 3 metres) – I used Purple, Red and Black

N.b.If you are a size 8-12 you will probably only need 2 metres so divide your colours accordingly), I’m a size 16 and used 3 metres to make the skirt with a couple of inches left over from each colour.

First measure your elastic to your waist size minus a couple of inches. Sew your elastic together using a needle and thread or a sewing machine. A sewing machine it better since you can use a zigzag stitch to avoid it just snapping. If you are using a needle and thread try to imitate a zig zag stitch as shown below:

zigzag stitch

Fold your tulle in half and cut into 4 inch strips. Repeat for all colours.

Place your elastic on something easy to work from, I used the ironing board:

HalloweenElastic

Attach your tulle to your elastic by using the fold you already created to cut the tulle to create a loop, tuck this loop behind the elastic, bring it over the elastic and pull the remaining tulle through the loop:

HalloweenLoopsKeep doing this until you run out of tulle or the elastic is full. I started with red tulle and then added in purple and black until I had a full skirt:

FinishedSkirt

I paired my skirt with this top from H&M but any lacy top would work:

LaceTopHM

Added my amazing wings:

wings

And painted my face silver and purple:

facepaint

What did you dress as for Halloween?

Prepare your pets for Fireworks Season

Fireworks

When I was a kid I loved Bonfire Night, I loved fireworks and sparklers and checking the bonfire for hedgehogs. Our street always did our own fireworks display in a local horse paddock (sans horses obviously).

Now though Bonfire Night, New Years Eve and lots of other random evenings are spent trying to ignore Apple while she shakes uncontrollably at my feet. This sounds cruel but beyond giving her a safe place to hide and trying to distract her, I don’t have a lot of choice. Cuddling her or reassuring her in a human way would reinforce the idea that there’s something to be afraid of and I hope that with lots of work, she will one day learn that there’s no reason to be scared.

To help your dog or other furry friend cope with Fireworks season wherever you may be in the world, follow these straight-forward tips:

DO:

  • Give your pet somewhere safe and quiet that they can retreat to if they are scared. This could be a crate or a den that you create in the living room if your pet’s crate is usually kept somewhere else.
  • Avoid walking dogs after dark. Some people start setting off fireworks at 5:30 pm when the light has barely disappeared from the sky! Aim for no later than 3 pm in the UK if you can.
  • Close all windows and curtains.
  • Ensure your pet is microchipped in case they escape in their panic.
  • Put the TV on or play music to cover the noise of the fireworks as best you can.
  • Ignore the fireworks yourself, this will encourage your pet to think that there is no reason to be scared.
  • Seek help from a behaviour therapist if your pet appears to have a serious phobia of fireworks.

DON’T:

  • Let dogs out into the garden after dark without a lead. This is not the time to discover that your garden isn’t escape proof.
  • Force your pet to come out of the hiding place, if they feel safe and they aren’t in any danger, leave them be.
  • Try to “de-sensitise” your dog to fireworks by exposing them to a display. Any attempts at behaviour modification should only be done under the supervision of a trained professional.
  • Take your pet to a fireworks display, even if they seem fine, they are most likely not enjoying it. Leave them safely at home.

Best DIY gifts for Best Friends

Continuing my posts on DIY gifts for different people in your life, I’ve compiled my favourite gifts for best friends. Besties can be hard to buy for, especially if you don’t see them as often as you’d like to!

1. Teacup Lights

Teacup Lights

This is a super cute DIY, that’s gentle on the purse but looks awesome when given to someone.

2. Mini Book Necklace

I love this DIY, I’ve made two of these for my besties in the past and will likely make another for myself soon!

3. Scrabble Coasters

I love all things scrabble themed and these would make a gorgeous gift.

4. DIY Gold Flutes

DIY Painted Glass

I love how elegant these glasses are and how easy they are to do!

5. Homemade coffee syrups

Coffee-Syrups-ChaosServedDa

Perfect for your caffeine addicted bestie!

6. Cute make-up bag

IMG_6560

I for one am always in need of a new makeup bag and this DIY is super easy. Pick fabric to suit their personality and go to town!

7. Earlier this year I posted my monogrammed mugs DIY made for a couple of my besties:

Finished Mugs

I really enjoyed making these mugs and I’m tempted to make some more this year!

8. DIY Mini Spa Kit

For your stressed out bestie, pair with slippers and a hot water bottle so they can pamper themselves and relax.

9. 30 Minute Infinity Scarf (You don’t even need knitting needles!)

30-minute-infinity-scarf-gaba

Ok, I’m going to have to make this even if I don’t give it to anyone else, it looks so snuggly and so easy to make.

10. Emergency Chocolate

Emergency Chocolate Craft on 30 Minute Crafts

When in doubt, chocolate is the answer and this is an awesome way to give it!

These are my top 10, let me know in the comments which are your faves…

Pin this for later:

BFFOval

10 Best DIY Gifts for “Geeks”

Continuing the Christmas DIY gift lists, these are my 10 best DIY gifts for so called “geeks”. Really this is just a chance for my fave Fandom based DIYs to shine!

1. Bow Tie Tuxedo frame:

Credit: Plaid

So this tutorial isn’t actually Dr Who themed but it was where my brain went immediately when I saw it. I would theme it with a white checked shirt and add braces to make it even more Dr Who themed. Add a photo of you and your geeky friend for the perfect, personal gift!

2. Batman Lamp:

Picture of Batman lamp

Credit: fabrika.carolija

This looks awesome and the perfect gift for the Batman fanatic in your life!

3. Harry Potter Wand:

Tutorial to make these diy wands for your Harry Potter party

Credit: Boxy Colonial

This tutorial is aimed at making multiple wands for a Harry Potter party but there’s nothing to stop you making one for your geeky loved one!

4. Darth Vader Shoes:

Darth Vader Shoes Tutorial

Credit: Twin Dragon Fly Designs

I love geeky shoes. They’re practical, subtle (ish) and still show your geeky side.

5. TARDIS Christmas Tree Ornament:

Picture of DIY TARDIS Ornament

Credit: craftycounterpart

The perfect addition to any Whovian’s Christmas Tree.

6. Comic Book Heels:

Credit: ironspleen

I don’t even think this needs explanation… amazing.

7. Harry Potter Potions Kit

Harry Potter potions kit

Credit: Stitch/Craft

This is amazing, I want this, who wouldn’t want this? The potions actually do things (spoilers, it’s basically a science experiment wrapped up as Harry Potter which I LOVE.)

8. Pixel Trash Can:

Picture of Pixel Trash Can

Credit: BrittLiv

Practical and geeky. Wins every time!

9. Pikachu Hoodie:

Pikachu-Hoodie-Instagram

Credit: kawaiikakkoiisugoi

Gotta catch ’em all! Perfect DIY for the Pokémon fan in your life!

10. Hunger Games Tote Bag:

Credit: showmecute

May the odds be ever in your favour when you make this awesome tote bag!

Pin this for future reference:

geekoval